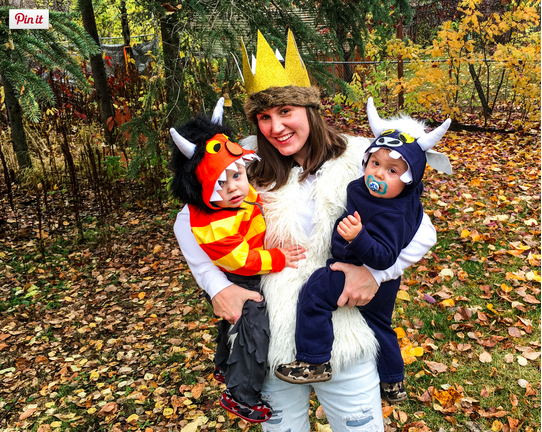
No “Where the Wild Things Are” party would be complete without, of course, a few Wild Things. I admit, I’m at least a day late posting this because it’s Monday and we’re kicking off the next weekly theme for our Halloween Blog Party today over at Alaska Knit Nat. Twin toddler Wild Thing wrangling is my excuse.
 To accompany my Max costume, here is my DIY Wild Thing costume tutorial for my little wilds. And please believe, the definition of wild is trying to photograph these two in costume. The outtakes are worthy of their own album.


I opted to use hooded sweatshirts as the foundation for each costume, which is great for trick-or-treating in Alaska because we can layer underneath as much as we need to. And because of how I built the costumes, I can always remove all the DIY elements and re-use the hoodies after Halloween. (Or not, and just let them run around with horns the rest of the year.)

For the Moishe (or Carol) costume, I purchased an orange Kids Corner hoodie from Fred Meyer ($9.99) and gray knit pants from Old Navy ($4.97, they were on sale for 50% off). The pants are one size larger than what my kids currently wear, and we already owned the same pair in their size. Because I planned on cutting up the pants, I wanted to make sure we had a layer for them to wear underneath. The orange hoodie ended up giving our Moishe a Bert-and-Ernie vibe, but we’re rolling with it. Starting with a pale yellow hoodie (if you can find one) might be the better options.
For the Bernard costume, I purchased a navy hoodie and matching sweatpants at Kohl’s ($7.99 each).

Other items I purchased included felt sheets in orange, gray, white, yellow, and black (six sheets total at $0.98 each) from Michael’s, faux fur squares in white and black ($3.79 each) from Michael’s, and a large piece of shaggy black felt ($11.99) also from Michael’s, which I ended up not using and will return. I also bought yellow duct tape ($3.54) from Target and a package of UGlu glue dash sheets ($9.49) from Jo-Ann Fabric and Craft Store. I highly recommend these UGlu dashes because they hold (and hold up through a toddler tugging session) better than fabric glue with zero mess.
Most of the elements for each costume are similar so I made them in tandem, but will be sure to point out the differences below.
First, I cut out the eyes and nose of each character freehand from the various felt sheets. Using the UGlu dashes, I secured the loose elements together.

Next, I cut out the teeth for each character from white felt, leaving approximately an inch strip of felt along the opposite edge of the teeth. Each set of teeth are only as long as the felt sheet.

I also cut out Bernard’s ears, again freehand.

The horns were probably the most challenging part of the costume. I drew a horn shape freehand on a piece of white felt, cut it out and used it as the template, drawing and cutting seven additional horn sides (eight total for four horns).

Once cut, I placed two of the cut-outs back to back and used a simple running stitch around the edge to sew them together. Next, I turned the horns right-side out and stuffed them with shredded cotton balls, leaving approximately an inch and a half of felt at the end of each horn.

Because the horns were to be stitched onto the sweatshirt hood, I needed to create a base. Using the inch and a half of felt left at the end of each horn, I folded each side in, similar to wrapping a present. To secure the felt in place, I stitched a few loops around the top and underneath the folds. (For Bernard’s horns, I also folded the ears in half length-wise and included the ear in this loop stitch so it was attached to the horn.)

Once the horns were secured, I glued the eyes and nose in place on the top of the hood and then lined the inside edge of each hood with the felt inch edge of teeth so that just the teeth could be seen – all using the UGlu dashes.
For the rest of Moishe costume, I used the yellow duct tape to create yellow stripes on the orange hoodie. I worked slowly, ensuring I could wrap the tape all the way around the back of hoodie or all the way around the arm so that each stripe was one long strip of tape. Where the tape had to be cut (at the zipper or shoulder, for example), it required a bit trial and error to make sure the tape ends lined up, but the tape is forgiving.
To create the feathered effect on the pants, I sketched alternating “Vs” down each pant leg using chalk and then cut the “Vs” by pinching the pant at each V and snipping it at an angle. I also cut a zig-zag along the bottom edge of each pant leg.

The final piece for each costume was securing the faux fur on top. For Bernard, I cut a small patch of white fur and secured it between the horns. For Moishe, I cut the black fur rectangle in half, stapled the halves together end to end and then starting from the center of the hoodie right behind the eyes, secured the fur at an angle on each side all the way down to the base of the neck. I cut slits in the fur and slide it over the horns, and secured the back edge of the fur along the back of the hoodie using additional UGlu dashes.

Leslie Boyd, aka AKShopGirl, lives, writes and raises twins in Anchorage. This post originally appeared on her blog.